


Showing posts with label gifts. Show all posts
Showing posts with label gifts. Show all posts
Thursday, September 6, 2012

Tuesday, June 26, 2012
Gifts a {to go}-go

playing cards :: crystal highballs :: personalized stationery :: baby shoes :: stroller blanket :: pounding plug
Don't forget to wrap the gifts as soon as you buy them, but leave the ribbon off until you are ready to leave. I wrap everything in metallic lime green (signature color) which works for every occasion. You can also choose white or kraft - or create your own signature look and run with it. Love pink? It will work, everyone will know the gift is for you, even if you forget a card.
Tuesday, June 19, 2012
Spoiled rotton

Yesterday I opened the mail and what to my wondering eyes should appear? But a beautiful blue box and a gift so premier. An orange leather wallet that feels so deluxe with a place for your phone, your cards and your bucks. Over the rustling of tissue I could almost hear the sound of sleigh bells and hoof steps - as if Christmas was near.
Wednesday, May 9, 2012
Mother's Day Gift Guide

Are you ready for Mother's Day? And don't forget that it's not just the actual blood related mothers who should be honored this weekend. There are all kinds of maternal people in our lives who would love a little recognition this Mother's Day.
So shake up a cocktail, make something special, or pop into everyone's favorite jewelry store and celebrate!
cook it
craft it
buy it

Tuesday, May 8, 2012
A Mother's Day Wish List

I don't need diamonds or jewels, but I would love a few thoughtful things from the children I bore in my body and succumbed to "mom hips" for.
bins :: punch bowl :: card :: watch :: crepe paper :: doughnut book
Monday, February 13, 2012
Valentine Surprises
I am not the type of girl who expects big gifts for Valentine's Day. But there are a few trinkets I'd love to see...

Jeni's Valentine Collection
The Perfect Manhattan
Converse
Cabana Umbrellas
Jeni's Valentine Collection
The Perfect Manhattan
Converse
Cabana Umbrellas
Tuesday, December 13, 2011
Good Morning
What a weekend. Wait, it isn't Monday? I don't know what has happened, but the weekend and the entire day yesterday flew by before I knew it. We got a lot done - and Christmas shopping was not one of them.
Today's goal is to get all of the craft supplies needed to start some of the crafts we have planned. There are a few gifts we still have to pick up at the store too - so we'll see if we can cram that in too.

Yikes! Who let me get this far into December before starting my craft projects? Shame on me. Lucky for all of us, it's not too late. Let's get these things done!
-a
Today's goal is to get all of the craft supplies needed to start some of the crafts we have planned. There are a few gifts we still have to pick up at the store too - so we'll see if we can cram that in too.
:: DIY Monogram Mugs :: Sharpie Dyed Cotton :: Keychain is a "cross your fingers" project :: Polymer gift tags :: Silhouettes didn't have a tutorial. Think I can figure it out?
Yikes! Who let me get this far into December before starting my craft projects? Shame on me. Lucky for all of us, it's not too late. Let's get these things done!
-a
Friday, August 26, 2011
Back to School :: Flower pot craft for Teachers

I know I've always been a bit of a suck up with my teachers. But it always seemed to pay off. And, for the most part, I genuinely liked my teachers. It wasn't technically sucking up, it was just being nice. It wasn't interpreted that way by everyone else...
It's rubbed off on my kids and I do nothing to discourage it. In fact, the opposite. And why the heck not? Treat your teachers to something special for their desks this fall and make them a personalized pot of flowers. It's actually really easy because you can use Porcelaine brand markers which are designed to write on glazed ceramic and are then baked to seal it in. You could do the same thing with a mug too - and maybe fill it with a Starbucks Card or coffee beans!
Happy Back to School!

You’ll need:
Glazed ceramic pots
Ceramic paint pens (Porcelaine brand)
Tape
Pencil
Step 1 :: Print out your teacher’s name on the computer scaled to fit on the pot
Step 2 :: Gently rub the side of the pencil lead on the back of the printed out name until entirely covered in pencil lead.
Step 3 :: Tape name to the pot, pencil lead side down.
Step 4 :: Trace around the letters of name with a pencil pressing moderately hard.
Step 5 :: Carefully remove paper.
Step 6 :: Trace letters with Porcelaine ceramic paint pens. Let dry and set according to package instructions.
Step 7 :: Fill with dirt and plant flowers. Water well.
Optional :: Replace any “o”’s with an apple or dot an “i” with one!
Monday, July 25, 2011
Baby Gifts :: Personalized Blocks

Last week, Cool Mom Picks posted about these cool baby blocks and I had to add my two cents. These are cool, but the block I received for a gift when Pearl was born is way cooler.


They aren't expensive, and they are a great little memento with all of the vital information. Plus, if you are giving them as a gift there is the opportunity to put your name on the bottom so they always remember who gave them such a special gift.
Order them online here.
Friday, June 17, 2011
Good Afternoon
It's been a crazy week and the craziness continues through the weekend at our house. Today I'm on KOMO 4 News at 4pm with ideas for Father's Day. Then tomorrow I am at Molbak's at 12:30 with ideas for planting for summer and what to do with the plants, fruits, vegetables, etc. once they bloom. Stop by and say hi!
Then there's Father's Day on Sunday. I have lots of ideas on what to do - but we also have a lot of work to do on the basement this weekend which may trump any leisurely plans around a barbecue.
A ton of cute ideas are posted all over this morning, here are a just a few that I loved. Have a great weekend!

How can you not love these Fried Chicken Cookies? Love them!

The nut doesn't fall far from the tree. On a t-shirt. Genius.
Then there's Father's Day on Sunday. I have lots of ideas on what to do - but we also have a lot of work to do on the basement this weekend which may trump any leisurely plans around a barbecue.
A ton of cute ideas are posted all over this morning, here are a just a few that I loved. Have a great weekend!
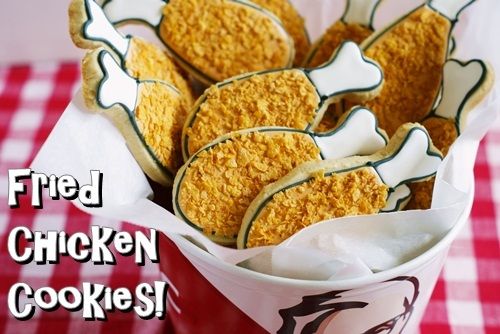
How can you not love these Fried Chicken Cookies? Love them!
The nut doesn't fall far from the tree. On a t-shirt. Genius.
Friday, February 11, 2011
Craft It :: Pocket Valentine

I love tiny Valentines. I love the idea of sticking these in Mr. Hedin's pockets, briefcase, and lunch bag for him to discover throughout the day. I found the little glassine envelopes at Packaging Specialties and cut some card stock to fit. I have a set of rubber stamps that I used to write out my messages, but they can be handwritten as well.
I found these other Valentines that are almost the same idea, but in a little different scale.
Giant ::


Tiny ::


Thursday, February 10, 2011
Craft It :: Valentine Hair Pins

Is anything more adorable than a little girl with cute hairpins? Not that I haven't been known to wear them too - but better on the younger set. At the store, these can be a little pricey. Not ridiculous, but actually slightly ridiculous when you realize you can buy 25 bobby pins and 100 rhinestones for the same price. Cha-Ching. And after I glued a handful of rhinestones I realized that anything small with a flat bottom would work - a bow - a paper rose - the options are endless!
You'll need
Bobby pins
Rhinestones
Hot Glue Gun + Glue
Step 1 :: Glue the rhinestone to the bobby pin.
As for the card, I used some red card stock that I had around the house and poked two holes in it with a small circle hole punch. If I would have had a heart shape hole punch I would have used that in a heartbeat. But I didn't - it's on the list now of things I "need."
Craft It :: Valentine Cufflinks

When I discovered that you could buy good quality cufflink backs at the jewelry supply store I was suddenly anxious to find things to glue to them. For Valentine's Day I've created a super personal heart shape. I say super personal because it's embedded with finger prints from molding the clay - and that's how I like it. It has a really charming hand formed quality and becomes even more special if your kids make the hearts.
You'll need
Oven bake clay
Cufflink backs
Hot glue + gun
Step 1 :: Break off a small piece of clay and form two hearts measuring between 1/2 - 1 inch tall.
Step 2 :: Place clay on a cookie sheet and bake per package instructions. Let cool.
Step 3 :: Using the 'high' setting on the hot glue gun adhere the cooled heart to the cufflink back. Let set.

Kid's help advice :: From 3 years old and up, you can give them the correct amount of clay and let them form the heart. Don't let kids younger than about 8 help with the glue gun. The 'high' setting on most glue guns can burn the skin. Be careful!
Wednesday, December 22, 2010
Craft it :: GIFTS!
Almost every year I make gifts for the family. Not just baked goods, but crafty little things. Last year I made aprons, monogrammed bags and homemade Rhubarb Vodka (yum!). This year I'm still brainstorming on my grown-up gifts but for the kids Lars and I made stamped t-shirts.

I got the idea from the lovely Design Mom who always has such clever gifts for her kids to make each other. And then, as I was trying to figure out how on earth to carve some of the things Lars had requested out of potato I had an idea - cookie cutters! We used the cookie cutters as a stamp as well. It turned out really cute.
My advice for working with a two year old is ::
:: Have them choose the color scheme
:: Have them choose the shapes
:: Let them stamp most of it
:: Fill in the "holes" with additional stamps.
Lars lost interest after the second stamp on the first shirt. Luckily, we had a show on TV at the same time, so I could finish the shirt and he would tune in again for the next shirt to decide the colors and shapes. There was a small amount of guidance on choosing - or should I say limiting - the choices.
Overall, they turned out really cute and I know the older kids will just think it's cool that Lars made them a shirt. The younger ones... well, they'll like the dinosaurs.

I got the idea from the lovely Design Mom who always has such clever gifts for her kids to make each other. And then, as I was trying to figure out how on earth to carve some of the things Lars had requested out of potato I had an idea - cookie cutters! We used the cookie cutters as a stamp as well. It turned out really cute.
My advice for working with a two year old is ::
:: Have them choose the color scheme
:: Have them choose the shapes
:: Let them stamp most of it
:: Fill in the "holes" with additional stamps.
Lars lost interest after the second stamp on the first shirt. Luckily, we had a show on TV at the same time, so I could finish the shirt and he would tune in again for the next shirt to decide the colors and shapes. There was a small amount of guidance on choosing - or should I say limiting - the choices.
Overall, they turned out really cute and I know the older kids will just think it's cool that Lars made them a shirt. The younger ones... well, they'll like the dinosaurs.
Wednesday, December 15, 2010
Make your own gifts :: Today on Q13

Here are the details for the things I'm talking about today with Kaci on Q13 Morning News. You can watch us live at 7:20, 8:20, and 9:20 this morning!
:: Etrog Citron Jelly
:: Salted Caramel Corn (in the book)
:: Double Chocolate Chip Cookies
:: Homemade Granola (in the book)
:: Rhubarb Vodka
Outside links
:: Where to order personalized napkins
:: Where to find the "Mr & Mrs" highball glasses
:: Packaging, ribbon, boxes, bags are all from here
:: Star cookie pan that I bought at Michael's
** Photo from my shoot with Better Homes and Gardens that was featured last December in the magazine **
Tuesday, December 14, 2010
Watch It :: Better NW Homemade Citrus Gifts
In case you missed it on TV last week, here is my segment from Better TV featuring gifts made of citrus!
Thursday, December 9, 2010
Behind the Scenes :: Better Northwest Citrus Gifts
Today on Better Northwest - KIRO at 9am

Here are a few images from the show. I'll post it later today - once it airs :)

Etrog Citron, Buddah's Hand Citron, Meyer Lemon, Pink Lemonade Lemon, Kafir Lime, Finger Limes, Satsuma... there are so many interesting varieties of citrus, you can customize your creation to be anything at all. The joy of making things yourself is that you can be creative!

Etrog Citron and Pink Lemonade Lemons :: Citron makes the best jelly (recipe to follow) and Pink Lemons are good for everything you use regular lemons for, they are a touch sweeter and look really cool.

Kirstin squeezing Pink Lemonade Lemons for our lemon curd.

Meyer Lemons getting ready to become Limoncello

Cranberry Orange Marmalade is awesome on brioche. The recipe comes from the Blue Chair Jam Cookbook

Live! Mixing up curd. I made ours while we were setting up and finished it on camera. Total it took about 20 minutes.
Make it :: Etrog Citron Jelly

I learned about Etrog Citron when I first read the Blue Chair Jam Cookbook. Which was awesome because I looked like a citrus rock star at Metropolitan Market when the produce guy started pulling stuff out of a box and I knew what they were. Seriously, he thought I was some sort of genius.
Then it got better because we went to Palm Springs where my in-law's had just discovered an Etrog Citron tree and didn't know what they were. Again, I looked like some sort of citrus savant.
Since being in Palm Springs was my vacation, I decided to make a marmalade. Once I started in on it things changed a bit and I ended up with a jelly. I have realized that, while I love the flavor of marmalade, I don't love big hunks of rind spread across my toast.
The process for this is a bit long - but not involved. And it's impressive to tell people that it's a THREE day process. But here's how the days break down
Day 1 :: Cut fruit & put in a big pan with water (20 minutes or less)
Day 2 :: Bring to a boil for 40 minutes (10 minutes of paying attention)
Day 3 :: Bring to a boil and cook until set. Ladle into jars. (about an hour)
My advice is to start it today. Then tomorrow you boil it and Saturday you are free to can and wrap them up. By Sunday morning you are eating your very own marmalade.
Etrog Citron Jelly
Makes 6 half pint jars
Inspired by Rachael Saunders of The Blue Chair Jam Cookbook
2 pounds Etrog Citron
2 pounds sugar
water
Slice citron in quarters, then slice into thin strips. Place all cut citron into a non-reactive pan (I use a Le Crueset) and cover fruit with water one inch above the top of the fruit. The easiest way to measure is to put your finger on top of the fruit. When the water reaches your first knuckle on your index finger, you're at about one inch. Let sit 24 hours.
Bring pan of fruit to a boil over medium high heat. Once it's reached a boil, reduce heat to a low boil and let cook 40 minutes. Stir occasionally to ensure it doesn't stick. After 40 minutes have elapsed, remove from heat, cover with a lid and let sit 24 hours.
Place five spoons in the freezer on a plate that can sit flat. Heat oven to 220 degrees and place clean jars on a cookie sheet in the oven.
Strain citron mixture through a sieve into a large bowl to remove fruit from mixture. Press on the fruit to remove all liquid. Some pieces of pulp will remain. If you don't want any pulp in your jelly, pass liquid through a piece of cheese cloth. Return liquid to pan and bring to a boil. Stir occasionally for about 20 minutes.
To check if your jelly is set, remove a spoon from the freezer and spoon out about 1/2 teaspoon. Return spoon to freezer for four minutes. When four minutes have elapsed, hold spoon vertically. If the jelly holds to the spoon and just makes a few wrinkles in the jelly - it's set. If it doesn't, continue cooking checking with remaining spoons every 5 minutes or so.
When finished, remove jars from oven and ladle citron jelly into them. Clean off the rim of the jar with a damp paper towel and screw on the lid. Be sure the jar rim is completely clean or your jelly won't seal. Turn jars upside down for one minute. Return right side up and let sit until the lid 'pops' and the seal is created. It should take between 20 minutes and one hour.
Check your jars after two hours. If they haven't sealed, place unsealed jars in the refrigerator.
Friday, September 10, 2010
Birthday Wish List
My birthday is Tuesday, and in case you have yet to get me something (ahem) here is what I am dreaming of.

Nikon D5000 Camera


Hermes Bracelets

Staub Cocotte in Basil
Oh, and a nanny, a housekeeper, and a personal trainer. Anyone want to chip in for those?

Nikon D5000 Camera


Hermes Bracelets

Staub Cocotte in Basil
Oh, and a nanny, a housekeeper, and a personal trainer. Anyone want to chip in for those?
Friday, June 18, 2010
Gifts :: Father's Day
Ack! Father's Day snuck up on my this year. I turned the calendar on Sunday night and realized it's this weekend! Here are a few gift ideas that I love. Pick your favorite and have a great day Sunday with the dads in your life.
#1

 One of my favorite preppy clothes outfitters - vineyard vines - has partnered with the USO to raise money for Operation Enduring Care - a long term initiative to support America's Wounded soldiers and their families. They've created a line of ties and bags where 100% of the proceeds benefit Operation Enduring Care. Since they are delightfully preppy they will be perfect for every dad you know.
Find out more here .
#2
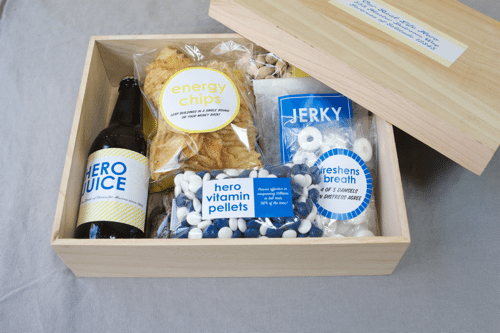
Make your own superhero treats. I love this idea for a picnic - relabel everything in your picnic basket for the super hero in your life.
Jordan Ferney has all of the templates, etc. here on Alphamom.com

#3

Create a car kit for dad to keep in his glove box. Megan from notmartha.org has the templates and instructions here. This is a great idea, especially for dads with young kids - include sunscreen, benedryl, and wipes. Love it!
#4

Dress up an apron. I would use freezer paper to create stencils and paint in the decoration. The image is from BH&G - and they used fabric and fusible interfacing to attach them. That wouldn't hold up well enough for me.
There is a slight panic, because this is what I did last year . How do I compete with lobster??
#1

 One of my favorite preppy clothes outfitters - vineyard vines - has partnered with the USO to raise money for Operation Enduring Care - a long term initiative to support America's Wounded soldiers and their families. They've created a line of ties and bags where 100% of the proceeds benefit Operation Enduring Care. Since they are delightfully preppy they will be perfect for every dad you know.
Find out more here .
#2
Make your own superhero treats. I love this idea for a picnic - relabel everything in your picnic basket for the super hero in your life.
Jordan Ferney has all of the templates, etc. here on Alphamom.com
#3

Create a car kit for dad to keep in his glove box. Megan from notmartha.org has the templates and instructions here. This is a great idea, especially for dads with young kids - include sunscreen, benedryl, and wipes. Love it!
#4

Dress up an apron. I would use freezer paper to create stencils and paint in the decoration. The image is from BH&G - and they used fabric and fusible interfacing to attach them. That wouldn't hold up well enough for me.
There is a slight panic, because this is what I did last year . How do I compete with lobster??
Subscribe to:
Posts (Atom)